-
[안드로이드] 구글 맵 API 이용하기카테고리 없음 2024. 5. 2. 21:36
사용법
1) Gradle 설정
우선 Google Map API를 사용하기 위해션 Gradle에 라이브러리를 추가해야 합니다.
dependencies {
    implementation("com.google.android.gms:play-services-maps:18.2.0")
    implementation("com.google.android.gms:play-services-location:21.2.0")
}
2) AndroidManifest 설정
아래처럼 인터넷과 위치를 불러올 수 있는 퍼미션을 추가해야 합니다.또한 application 안에 uses-library와 meta-data를 추가해줍니다.
로컬 파일에서 API를 가져오는 방법은 아래 게시글을 참조하면 됩니다.
https://cosinea.tistory.com/49
<?xml version="1.0" encoding="utf-8"?>
<manifest xmlns:android="http://schemas.android.com/apk/res/android"
    xmlns:tools="http://schemas.android.com/tools">

    <uses-permission android:name="android.permission.ACCESS_FINE_LOCATION" />
    <uses-permission android:name="android.permission.ACCESS_COARSE_LOCATION" />
    <uses-permission android:name="android.permission.INTERNET" />

    <application
        android:allowBackup="true"
        android:dataExtractionRules="@xml/data_extraction_rules"
        android:fullBackupContent="@xml/backup_rules"
        android:icon="@mipmap/ic_launcher"
        android:label="@string/app_name"
        android:roundIcon="@mipmap/ic_launcher_round"
        android:supportsRtl="true"
        android:theme="@style/Theme.Map"
        tools:targetApi="31">

        <uses-library
            android:name="org.apache.http.legacy"
            android:required="true" />

        <meta-data
            android:name="com.google.android.maps.v2.API_KEY"
            android:value="${GOOGLE_MAP_API}" />
        <meta-data
            android:name="com.google.android.gms.version"
            android:value="@integer/google_play_services_version" />

        <activity
            android:name=".MainActivity"
            android:exported="true"
            android:theme="@style/Theme.Map">
            <intent-filter>
                <action android:name="android.intent.action.MAIN" />
                <category android:name="android.intent.category.LAUNCHER" />
            </intent-filter>
        </activity>
    </application>
</manifest>
3) activity_main.xml
아래와 같이 FragmentContainerView를 선언 후
android:name을 Google의 SupportMapFragment으로 지정해야 합니다.
<?xml version="1.0" encoding="utf-8"?>
<androidx.constraintlayout.widget.ConstraintLayout xmlns:android="http://schemas.android.com/apk/res/android"
    xmlns:app="http://schemas.android.com/apk/res-auto"
    android:layout_width="match_parent"
    android:layout_height="match_parent">

    <androidx.fragment.app.FragmentContainerView
        android:id="@+id/mapFragment"
        android:layout_width="match_parent"
        android:layout_height="match_parent"
        android:name="com.google.android.gms.maps.SupportMapFragment"
        app:layout_constraintBottom_toBottomOf="parent"
        app:layout_constraintEnd_toEndOf="parent"
        app:layout_constraintStart_toStartOf="parent"
        app:layout_constraintTop_toTopOf="parent" />
</androidx.constraintlayout.widget.ConstraintLayout>
4) MainActivity
아래 내용은 길어서 코드에 주석을 달아 설명하겠습니다.
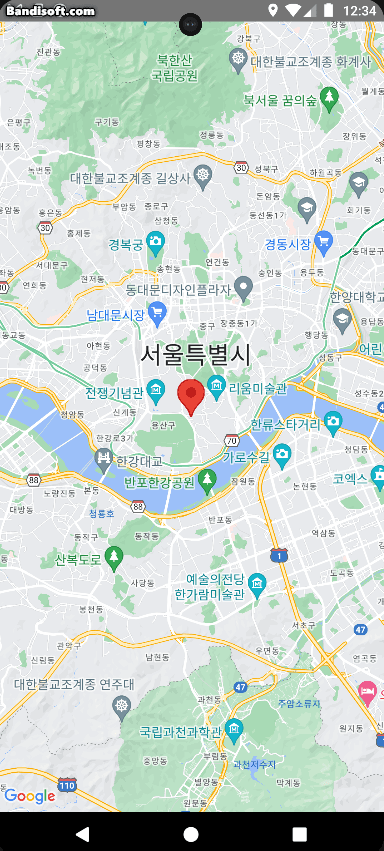
class MainActivity : AppCompatActivity(), OnMapReadyCallback {

    private val binding by lazy { ActivityMainBinding.inflate(layoutInflater) }

    // GoogleMap 변수로 선언
    private lateinit var googleMap: GoogleMap

    override fun onCreate(savedInstanceState: Bundle?) {
        super.onCreate(savedInstanceState)
        setContentView(binding.root)
        checkPermission()
    }

    // 퍼미션 있는지 체크 후 없으면 퍼미션 확인 창 띄우기
    private fun checkPermission() {
        val locationPermission = registerForActivityResult(
            ActivityResultContracts.RequestMultiplePermissions()
        ) { results ->
            val hasAllPermission = results.all { it.value }
            if (hasAllPermission) {
                registerFragment()
            } else {
                Toast.makeText(this, "권한 승인이 필요합니다.", Toast.LENGTH_LONG).show()
            }
        }
        // 퍼미션 확인 창 띄우기
        locationPermission.launch(
            arrayOf(
                Manifest.permission.ACCESS_COARSE_LOCATION,
                Manifest.permission.ACCESS_FINE_LOCATION
            )
        )
    }

    // SupportMapFragment으로 파싱 후 getMapAsync을 통해 Fragment에 비동기적으로 맵을 등록해줍니다.
    // 여기서 getMapAsync 인자에 있는 this는 OnMapReadyCallback입니다.
    private fun registerFragment() {
        val supportMapFragment = supportFragmentManager.findFragmentById(R.id.mapFragment) as SupportMapFragment
        supportMapFragment.getMapAsync(this)
    }

    // OnMapReadyCallback을 상속받으면 구현할 수 있는 함수입니다.
    // GoogleMap을 사용 가능할 때 호출됩니다.
    // 받은 GoogleMap을 위에 선언했던 변수에 저장합니다.
    override fun onMapReady(googleMap: GoogleMap) {
        this.googleMap = googleMap
        updateLocation()
    }

    // 퍼미션을 체크하는 기본 메서드가 너무 길어
    // 따로 퍼미션을 체크하는 구문을 만들어 Supress를 시켰습니다.
    @SuppressLint("MissingPermission")
    private fun updateLocation() {
        // FusedLocationProviderClient를 this(activity)를 기반으로 생성합니다.
        val fusedLocationProviderClient = LocationServices.getFusedLocationProviderClient(this)
        // 위치는 정확해야 하기 때문에 Priority를 최고로 지정하고 1000밀리세컨드(1초)마다 갱신하는 LocationRequest를 생성합니다.
        val locationRequest = LocationRequest.Builder(Priority.PRIORITY_HIGH_ACCURACY, 1000).build()
        // 위에서 선언한 주기마다 실행되는 콜백입니다.
        val locationCallback = object : LocationCallback() {
            override fun onLocationResult(locationResult: LocationResult) {
                // setLastLocation을 이용해 현재 위치를 이동시켜주었습니다.
                locationResult.locations.forEach(this@MainActivity::setLastLocation)
            }
        }
        if (hasPermission(Manifest.permission.ACCESS_FINE_LOCATION) && hasPermission(Manifest.permission.ACCESS_COARSE_LOCATION)) {
            // 주기에 따라 위치 요청을 업데이트 해주는 함수입니다.
            fusedLocationProviderClient.requestLocationUpdates(locationRequest, locationCallback, Looper.myLooper())
        }
    }

    // 퍼미션이 있는지 체크하는 함수입니다.
    private fun hasPermission(permission: String): Boolean {
        return ActivityCompat.checkSelfPermission(this, permission) == PackageManager.PERMISSION_GRANTED
    }

    private fun setLastLocation(lastLocation: Location) {
        // LatLng을 받은 위치 기반으로 생성해줍니다.
        val latLng = LatLng(lastLocation.latitude, lastLocation.longitude)
        // LatLng을 기반으로 마커를 생성합니다.
        val markerOptions = MarkerOptions().apply {
            position(latLng)
            title("내 위치")
        }
        // LatLng을 타겟팅하고 줌을 15만큼 땡기는 CameraPosition을 생성합니다.
        val cameraPosition = CameraPosition.Builder().target(latLng).zoom(12f).build()
        // CameraPosition을 기반으로 CameraUpdate를 생성합니다.
        val cameraUpdate = CameraUpdateFactory.newCameraPosition(cameraPosition)
        // 아까 생성한 마커를 추가해줍니다.
        googleMap.addMarker(markerOptions)
        // 화면(카메라)을 CameraUpdate 기반으로 움직입니다.
        googleMap.moveCamera(cameraUpdate)
    }
}
안드로이드 에뮬레이터의 위치를 설정하는 기능으로 위치를 옮겼습니다.